The installation of a roof follows a series of crucial steps to ensure a sturdy and watertight structure. Collaborating with experienced professionals like roofers in Melbourne guarantees a seamless process. First, the existing roofing material may need to be removed. Then, the roof deck is inspected and repaired as necessary. Next, underlayment is applied to create a barrier against moisture. Quality roofing materials, often recommended by local experts, like roofers in Melbourne, are then installed, ensuring proper ventilation and insulation. Flashing is carefully placed around vulnerable areas to prevent leaks. Finally, shingles or other roofing material are meticulously laid, and the roof is inspected to confirm its integrity. By adhering to these steps, a well-constructed roof is achieved, protecting your home from the elements and ensuring long-lasting durability.
We are pleased to analyze the process for you, step by step, tearing off the old roof. Cover the roof with felt paper. Install the next row of shingles over the first flashing, then cover that row with a stepped flashing, and so on. Nail the flashing into the wall toward the top of the flashing at the end that is closest to the spout, so that the next step that flashes in line covers the nail.
Not the keys through shingles. For information on flashing around chimneys, see Installing Once the water barrier is installed, the next step is to add another layer of protection against leaks and water damage. Your roofing contractor will do this by adding the drip edge to the bottom layer of the roof. The drip edge is placed on top of the water barrier and prevents water from running down the inside of the roof covering and running the risk of leaks.
Your roof is an important part of making sure you have a safe and secure home, and every homeowner deserves to have a roofing contractor they can trust to do a good job. Our Roofing Experts at ABC Roofing Corp. have years of experience and are here to serve all your roofing needs. Call ABC Roofing for your roof installation at 954-344-4622 or subscribe to our roofing videos for more information.
Drip molding carries rainwater directly to your roof gutters. Take your roofing nails and chalk line. Align drip molds and separate each installation nail 12 inches. Mark these spaces with chalk and start nailing.
Nail the roof valley flashing in the same way. You or your contractor will begin by installing a rope at the base of the roof spike at the level at which you want it to protrude. After installing the roof base in your house, you need to go over it with the drip edge on the sides in the same way as you did at the bottom. Although this seems to contradict the principle of overlap, the installation of the drip edge over the subfloor in the rakes creates a clean edge of the roof and provides the attachment of the subfloor with greater resistance against wind lift.
For even more in-depth information, or if you want to see and learn how professionals do it, check out this library of instructional videos on all aspects of tile installation and roofing components. If you are installing the stacking flashing type with a rubber sheath that seals around the pipe, spray paint the pipe a color similar to your roof. If you know what to expect with your roof installation, you can better understand what the process is. There are many do's and don'ts of installing roofs, and having a good understanding of the process will give you a better idea of what to expect from your roofing contractor.
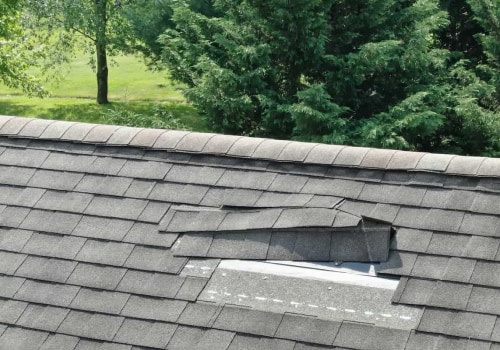
As shingles are installed in the adjoining roof area, the end of each row of shingles is trimmed (cut) 2″ rearward of the valley centerline. The most common closed valley is a “closed cut valley”, where shingles are first installed over the entire roof area on one side of the valley, with each course of shingles extending at least 12″ across the center line of the valley. The next time you read the package instructions or watch an instructional video on YouTube, you'll have a much better understanding of why shingles are installed as-is. Being in this position, not knowing how to install or maintain a roof, is also not ideal.
At the same time, the average homeowner would do well to understand one or two things about roof installation and maintenance. It is impossible to properly install the new flashing and subfloor if you do not tear off the old roof beforehand. Many people will install multiple layers of roofs on top of each other to save time; but adding too many layers (for example, if you live in an area that is prone to ice even for part of the year, it's important to install an ice and water barrier around the roof). If you follow these steps precisely, you will install a roof that maximizes its capabilities and lifespan without any problems.
Pair that newly installed roof with fencing from Dolphin Fence Corp. With their expertise and commitment to excellence, they provide exceptional fencing solutions that enhance security, privacy, and aesthetics of your property. Whether it's residential or commercial, their skilled professionals deliver top-notch craftsmanship and excellent customer service. Contact Dolphin Fence Corp today for all your fencing needs and experience the difference their expertise makes in transforming your property.