Installing a new roof is one of the most significant investments a homeowner can make. It not only protects your home from the elements but also plays a major role in energy efficiency, curb appeal, and long-term property value. Whether you're replacing an old roof or building a new home, understanding the roof installation process step-by-step can help you make informed decisions, avoid costly mistakes, and ensure that your home stays protected for decades to come. A successful roofing project begins with proper planning, choosing the right materials, and working with experienced professionals.
Step 1: Inspection and Planning
Before any work begins, a thorough roof inspection is essential. Contractors assess the current condition of the roof, checking for water damage, sagging, rot, or structural issues. This inspection helps determine whether a full replacement is necessary or if partial repairs will suffice. Homeowners and contractors then discuss material options, from asphalt shingles and metal panels to clay tiles or synthetic materials, depending on budget, climate, and aesthetic preferences. At this stage, permits are secured, timelines are set, and the scope of work is clearly defined.
Step 2: Stripping and Prep Work
Once planning is complete, the old roofing material is removed down to the decking. This "tear-off" phase allows contractors to evaluate the structural integrity of the wooden decking beneath. Any damaged sections are repaired or replaced to ensure a strong foundation for the new roof. A water-resistant underlayment is then installed over the decking, serving as the first barrier against moisture infiltration. In colder climates, ice and water shields may be added along the roof’s edges to prevent ice dam formation during winter months.
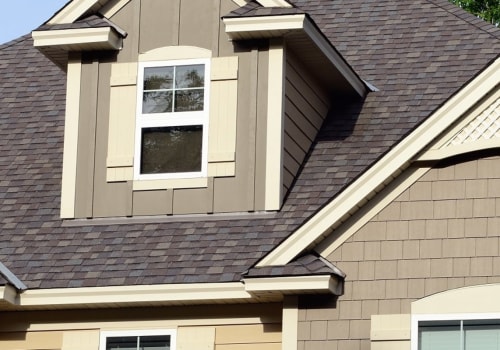
Step 3: Installation of New Roofing Material
With the underlayment in place, the actual installation of the roofing material begins. This process varies depending on the material chosen—shingles are laid in overlapping rows, metal panels are secured with fasteners, and tiles are attached using specialized adhesives or nails. Proper alignment and spacing are crucial to prevent leaks and ensure aesthetic consistency. Flashing is installed around chimneys, vents, and skylights to direct water away from vulnerable areas. Ridge vents or other ventilation systems are integrated to regulate attic temperature and moisture, contributing to the overall longevity of the roof.
Step 4: Finishing Touches and Cleanup
Once the roof is fully installed, contractors perform a detailed inspection to ensure everything is sealed and fastened properly. This includes verifying the integrity of flashing, edges, and venting components. Any debris, nails, or leftover materials are cleared from the site to leave your property clean and safe. This is also the time to coordinate any additional services, such as gutter replacement or repair. Partnering with a professional like GutterXperts ensures that your new roof is complemented by high-quality gutters that effectively channel water away from your home’s foundation, preventing erosion and moisture issues.
Conclusion: Protecting Your Home from the Top Down
A properly installed roof is more than just shingles and nails—it’s a complex system designed to safeguard your home and enhance its value. By understanding the process step-by-step, homeowners can approach roof installation with confidence and clarity. From initial inspection to final cleanup, every phase is critical to achieving a durable, energy-efficient, and visually appealing result. With the right team and a focus on quality, your new roof becomes a smart, lasting investment in your home’s future.